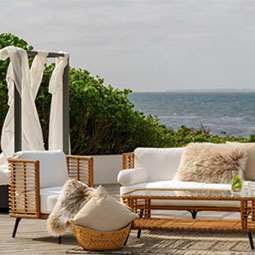
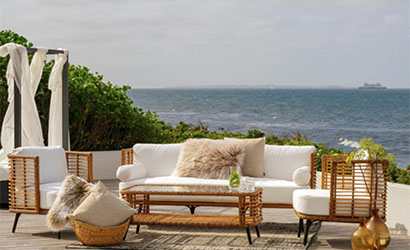
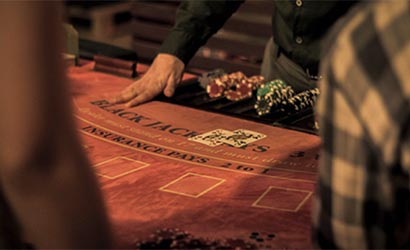
Livsstil Konsten att integrera utemöbler Att integrera utemöbler i hemmets design är en konstform som kräver omsorg och eftertanke. Det handlar om att finna balansen där gränsen mellan det... Livsstil Personlig touch med anteckningsblock Ibland är det de små sakerna som gör stor skillnad i vår dagliga rutin. Ett anteckningsblock med tryck kan verka som en simpel detalj, men det är... Livsstil Spela smart: Ansvarsfullt spelande När lusten att spela onlinecasino väcks, är det av yttersta vikt att balans och förnuft inte går förlorade i jakten på nästa stora vinst. Ansvarsfullt... Grooming Här är vårens hetaste herrfrisyrer Gentlemannalooken med mjuka vågor, eller soft rufs som matchar ett bångstyrigt skägg. Här är vårens hetaste frisyrer för män. Vi svämmar över... Hudvård Apelsinjuice för huden Ett glas juice på morgonen ger huden ett vackert sken. Den näringsrika drycken har positiva effekter på hyn, visar undersökningar. Att dricka apelsinjuice... Makeup 11 onödiga sminkmissar Det finns mycket smink i skönhetsvärlden och desto fler sätt att sminka sig på. Tro det eller ej, men dina sminkrutiner kan vara fel. Vi har tagit... 10 relationstips på semestern En klassiker bara ni två – skapa nya minnen genom att dra iväg på en roadtrip Hår Lyckas med salongsfönat hår hemma Aldrig känner vi oss så piffiga och fräscha som när vi precis vinkat hej då till frisören. Improveme.se guidar dig till hur du på bästa sätt får... Hälsa Nio effektiva sätt att lindra menssmärtorna Att ha mensvärk kan vara ett rent helvete för många. En del mår så pass dåligt att de till och med måste stanna hemma från jobbet eller skolan... Mat & dryck Så gör du dina egna macarones med lyxfaktor Aldrig förr har macarones varit så omtyckta och även om denna munsbit varit ett vanligt förekommande festinslag nere på kontinenten så dröjde det... Hudvård Lätta stegen till fina fötter Gör din fotbehandling hemma. Här kommer knepen till fina fötter hela sommaren. 1. Fotbad Tänk på att tvätta fötterna ofta under sommaren. Tappa... Hår Överlev utväxtfasen Trött på att vänta på att luggen ska växa ut? Här är din överlevnadsguide. Vissa människor trivs bäst med lugg, medan andra gillar att experimentera,... Livsstil 10 tips inför lägenhetsköpet Att köpa en lägenhet är en stor investering, både ekonomiskt och känslomässigt. Det är därför viktigt att vara väl förberedd innan du börjar... Våra mest älskade skönhetsklassiker De tidlösa produkterna vi aldrig tröttnar på Livsstil Utforska världen av casinon Välkommen till en mångsidig spelvärld bortom de svenska gränserna. Utforska casinon utan svensk licens, där ett kalejdoskop av spelmöjligheter och... Livsstil 5 kreativa sätt att använda digital teknik Teknik har blivit en integrerad del av vardagen, och för företag bidrar den till att göra olika processer mer effektiva. Med rätt verktyg hjälper... Livsstil Smarta tips vid val av ny mobil Smidig att bära med, bra kamera och snabb laddning. Det är bara några av kraven du säkert har när det är dags att köpa ny mobiltelefon. Men det... Livsstil 10 tips för spel på casinon utan svensk licens Att spela på casino utan svensk licens har blivit alltmer populärt bland svenskar. Det finns dock några saker att ha i åtanke när man väljer att... Livsstil Upptäck din inre styrka - börja med att satsa på dig själv Vi lever i en värld där det är så lätt att fokusera på de omkring oss och bli fångade i jämförelsefällan. Men det är viktigt att komma ihåg... Livsstil Så kan du bli en bättre pokerspelare Att bli en framgångsrik pokerspelare kräver inte bara tur, utan även skicklighet, strategi och uthållighet. Oavsett om du är en nybörjare som vill... Sida 1 av 1 32312345...102030...nästa >Sista
Livsstil Personlig touch med anteckningsblock Ibland är det de små sakerna som gör stor skillnad i vår dagliga rutin. Ett anteckningsblock med tryck kan verka som en simpel detalj, men det är... Livsstil Spela smart: Ansvarsfullt spelande När lusten att spela onlinecasino väcks, är det av yttersta vikt att balans och förnuft inte går förlorade i jakten på nästa stora vinst. Ansvarsfullt... Grooming Här är vårens hetaste herrfrisyrer Gentlemannalooken med mjuka vågor, eller soft rufs som matchar ett bångstyrigt skägg. Här är vårens hetaste frisyrer för män. Vi svämmar över... Hudvård Apelsinjuice för huden Ett glas juice på morgonen ger huden ett vackert sken. Den näringsrika drycken har positiva effekter på hyn, visar undersökningar. Att dricka apelsinjuice... Makeup 11 onödiga sminkmissar Det finns mycket smink i skönhetsvärlden och desto fler sätt att sminka sig på. Tro det eller ej, men dina sminkrutiner kan vara fel. Vi har tagit... 10 relationstips på semestern En klassiker bara ni två – skapa nya minnen genom att dra iväg på en roadtrip Hår Lyckas med salongsfönat hår hemma Aldrig känner vi oss så piffiga och fräscha som när vi precis vinkat hej då till frisören. Improveme.se guidar dig till hur du på bästa sätt får... Hälsa Nio effektiva sätt att lindra menssmärtorna Att ha mensvärk kan vara ett rent helvete för många. En del mår så pass dåligt att de till och med måste stanna hemma från jobbet eller skolan... Mat & dryck Så gör du dina egna macarones med lyxfaktor Aldrig förr har macarones varit så omtyckta och även om denna munsbit varit ett vanligt förekommande festinslag nere på kontinenten så dröjde det... Hudvård Lätta stegen till fina fötter Gör din fotbehandling hemma. Här kommer knepen till fina fötter hela sommaren. 1. Fotbad Tänk på att tvätta fötterna ofta under sommaren. Tappa... Hår Överlev utväxtfasen Trött på att vänta på att luggen ska växa ut? Här är din överlevnadsguide. Vissa människor trivs bäst med lugg, medan andra gillar att experimentera,... Livsstil 10 tips inför lägenhetsköpet Att köpa en lägenhet är en stor investering, både ekonomiskt och känslomässigt. Det är därför viktigt att vara väl förberedd innan du börjar... Våra mest älskade skönhetsklassiker De tidlösa produkterna vi aldrig tröttnar på Livsstil Utforska världen av casinon Välkommen till en mångsidig spelvärld bortom de svenska gränserna. Utforska casinon utan svensk licens, där ett kalejdoskop av spelmöjligheter och... Livsstil 5 kreativa sätt att använda digital teknik Teknik har blivit en integrerad del av vardagen, och för företag bidrar den till att göra olika processer mer effektiva. Med rätt verktyg hjälper... Livsstil Smarta tips vid val av ny mobil Smidig att bära med, bra kamera och snabb laddning. Det är bara några av kraven du säkert har när det är dags att köpa ny mobiltelefon. Men det... Livsstil 10 tips för spel på casinon utan svensk licens Att spela på casino utan svensk licens har blivit alltmer populärt bland svenskar. Det finns dock några saker att ha i åtanke när man väljer att... Livsstil Upptäck din inre styrka - börja med att satsa på dig själv Vi lever i en värld där det är så lätt att fokusera på de omkring oss och bli fångade i jämförelsefällan. Men det är viktigt att komma ihåg... Livsstil Så kan du bli en bättre pokerspelare Att bli en framgångsrik pokerspelare kräver inte bara tur, utan även skicklighet, strategi och uthållighet. Oavsett om du är en nybörjare som vill... Sida 1 av 1 32312345...102030...nästa >Sista
Livsstil Spela smart: Ansvarsfullt spelande När lusten att spela onlinecasino väcks, är det av yttersta vikt att balans och förnuft inte går förlorade i jakten på nästa stora vinst. Ansvarsfullt... Grooming Här är vårens hetaste herrfrisyrer Gentlemannalooken med mjuka vågor, eller soft rufs som matchar ett bångstyrigt skägg. Här är vårens hetaste frisyrer för män. Vi svämmar över... Hudvård Apelsinjuice för huden Ett glas juice på morgonen ger huden ett vackert sken. Den näringsrika drycken har positiva effekter på hyn, visar undersökningar. Att dricka apelsinjuice... Makeup 11 onödiga sminkmissar Det finns mycket smink i skönhetsvärlden och desto fler sätt att sminka sig på. Tro det eller ej, men dina sminkrutiner kan vara fel. Vi har tagit... 10 relationstips på semestern En klassiker bara ni två – skapa nya minnen genom att dra iväg på en roadtrip Hår Lyckas med salongsfönat hår hemma Aldrig känner vi oss så piffiga och fräscha som när vi precis vinkat hej då till frisören. Improveme.se guidar dig till hur du på bästa sätt får... Hälsa Nio effektiva sätt att lindra menssmärtorna Att ha mensvärk kan vara ett rent helvete för många. En del mår så pass dåligt att de till och med måste stanna hemma från jobbet eller skolan... Mat & dryck Så gör du dina egna macarones med lyxfaktor Aldrig förr har macarones varit så omtyckta och även om denna munsbit varit ett vanligt förekommande festinslag nere på kontinenten så dröjde det... Hudvård Lätta stegen till fina fötter Gör din fotbehandling hemma. Här kommer knepen till fina fötter hela sommaren. 1. Fotbad Tänk på att tvätta fötterna ofta under sommaren. Tappa... Hår Överlev utväxtfasen Trött på att vänta på att luggen ska växa ut? Här är din överlevnadsguide. Vissa människor trivs bäst med lugg, medan andra gillar att experimentera,... Livsstil 10 tips inför lägenhetsköpet Att köpa en lägenhet är en stor investering, både ekonomiskt och känslomässigt. Det är därför viktigt att vara väl förberedd innan du börjar... Våra mest älskade skönhetsklassiker De tidlösa produkterna vi aldrig tröttnar på Livsstil Utforska världen av casinon Välkommen till en mångsidig spelvärld bortom de svenska gränserna. Utforska casinon utan svensk licens, där ett kalejdoskop av spelmöjligheter och... Livsstil 5 kreativa sätt att använda digital teknik Teknik har blivit en integrerad del av vardagen, och för företag bidrar den till att göra olika processer mer effektiva. Med rätt verktyg hjälper... Livsstil Smarta tips vid val av ny mobil Smidig att bära med, bra kamera och snabb laddning. Det är bara några av kraven du säkert har när det är dags att köpa ny mobiltelefon. Men det... Livsstil 10 tips för spel på casinon utan svensk licens Att spela på casino utan svensk licens har blivit alltmer populärt bland svenskar. Det finns dock några saker att ha i åtanke när man väljer att... Livsstil Upptäck din inre styrka - börja med att satsa på dig själv Vi lever i en värld där det är så lätt att fokusera på de omkring oss och bli fångade i jämförelsefällan. Men det är viktigt att komma ihåg... Livsstil Så kan du bli en bättre pokerspelare Att bli en framgångsrik pokerspelare kräver inte bara tur, utan även skicklighet, strategi och uthållighet. Oavsett om du är en nybörjare som vill... Sida 1 av 1 32312345...102030...nästa >Sista
Grooming Här är vårens hetaste herrfrisyrer Gentlemannalooken med mjuka vågor, eller soft rufs som matchar ett bångstyrigt skägg. Här är vårens hetaste frisyrer för män. Vi svämmar över... Hudvård Apelsinjuice för huden Ett glas juice på morgonen ger huden ett vackert sken. Den näringsrika drycken har positiva effekter på hyn, visar undersökningar. Att dricka apelsinjuice... Makeup 11 onödiga sminkmissar Det finns mycket smink i skönhetsvärlden och desto fler sätt att sminka sig på. Tro det eller ej, men dina sminkrutiner kan vara fel. Vi har tagit... 10 relationstips på semestern En klassiker bara ni två – skapa nya minnen genom att dra iväg på en roadtrip Hår Lyckas med salongsfönat hår hemma Aldrig känner vi oss så piffiga och fräscha som när vi precis vinkat hej då till frisören. Improveme.se guidar dig till hur du på bästa sätt får... Hälsa Nio effektiva sätt att lindra menssmärtorna Att ha mensvärk kan vara ett rent helvete för många. En del mår så pass dåligt att de till och med måste stanna hemma från jobbet eller skolan... Mat & dryck Så gör du dina egna macarones med lyxfaktor Aldrig förr har macarones varit så omtyckta och även om denna munsbit varit ett vanligt förekommande festinslag nere på kontinenten så dröjde det... Hudvård Lätta stegen till fina fötter Gör din fotbehandling hemma. Här kommer knepen till fina fötter hela sommaren. 1. Fotbad Tänk på att tvätta fötterna ofta under sommaren. Tappa... Hår Överlev utväxtfasen Trött på att vänta på att luggen ska växa ut? Här är din överlevnadsguide. Vissa människor trivs bäst med lugg, medan andra gillar att experimentera,... Livsstil 10 tips inför lägenhetsköpet Att köpa en lägenhet är en stor investering, både ekonomiskt och känslomässigt. Det är därför viktigt att vara väl förberedd innan du börjar... Våra mest älskade skönhetsklassiker De tidlösa produkterna vi aldrig tröttnar på Livsstil Utforska världen av casinon Välkommen till en mångsidig spelvärld bortom de svenska gränserna. Utforska casinon utan svensk licens, där ett kalejdoskop av spelmöjligheter och... Livsstil 5 kreativa sätt att använda digital teknik Teknik har blivit en integrerad del av vardagen, och för företag bidrar den till att göra olika processer mer effektiva. Med rätt verktyg hjälper... Livsstil Smarta tips vid val av ny mobil Smidig att bära med, bra kamera och snabb laddning. Det är bara några av kraven du säkert har när det är dags att köpa ny mobiltelefon. Men det... Livsstil 10 tips för spel på casinon utan svensk licens Att spela på casino utan svensk licens har blivit alltmer populärt bland svenskar. Det finns dock några saker att ha i åtanke när man väljer att... Livsstil Upptäck din inre styrka - börja med att satsa på dig själv Vi lever i en värld där det är så lätt att fokusera på de omkring oss och bli fångade i jämförelsefällan. Men det är viktigt att komma ihåg... Livsstil Så kan du bli en bättre pokerspelare Att bli en framgångsrik pokerspelare kräver inte bara tur, utan även skicklighet, strategi och uthållighet. Oavsett om du är en nybörjare som vill... Sida 1 av 1 32312345...102030...nästa >Sista
Hudvård Apelsinjuice för huden Ett glas juice på morgonen ger huden ett vackert sken. Den näringsrika drycken har positiva effekter på hyn, visar undersökningar. Att dricka apelsinjuice... Makeup 11 onödiga sminkmissar Det finns mycket smink i skönhetsvärlden och desto fler sätt att sminka sig på. Tro det eller ej, men dina sminkrutiner kan vara fel. Vi har tagit... 10 relationstips på semestern En klassiker bara ni två – skapa nya minnen genom att dra iväg på en roadtrip Hår Lyckas med salongsfönat hår hemma Aldrig känner vi oss så piffiga och fräscha som när vi precis vinkat hej då till frisören. Improveme.se guidar dig till hur du på bästa sätt får... Hälsa Nio effektiva sätt att lindra menssmärtorna Att ha mensvärk kan vara ett rent helvete för många. En del mår så pass dåligt att de till och med måste stanna hemma från jobbet eller skolan... Mat & dryck Så gör du dina egna macarones med lyxfaktor Aldrig förr har macarones varit så omtyckta och även om denna munsbit varit ett vanligt förekommande festinslag nere på kontinenten så dröjde det... Hudvård Lätta stegen till fina fötter Gör din fotbehandling hemma. Här kommer knepen till fina fötter hela sommaren. 1. Fotbad Tänk på att tvätta fötterna ofta under sommaren. Tappa... Hår Överlev utväxtfasen Trött på att vänta på att luggen ska växa ut? Här är din överlevnadsguide. Vissa människor trivs bäst med lugg, medan andra gillar att experimentera,... Livsstil 10 tips inför lägenhetsköpet Att köpa en lägenhet är en stor investering, både ekonomiskt och känslomässigt. Det är därför viktigt att vara väl förberedd innan du börjar... Våra mest älskade skönhetsklassiker De tidlösa produkterna vi aldrig tröttnar på Livsstil Utforska världen av casinon Välkommen till en mångsidig spelvärld bortom de svenska gränserna. Utforska casinon utan svensk licens, där ett kalejdoskop av spelmöjligheter och... Livsstil 5 kreativa sätt att använda digital teknik Teknik har blivit en integrerad del av vardagen, och för företag bidrar den till att göra olika processer mer effektiva. Med rätt verktyg hjälper... Livsstil Smarta tips vid val av ny mobil Smidig att bära med, bra kamera och snabb laddning. Det är bara några av kraven du säkert har när det är dags att köpa ny mobiltelefon. Men det... Livsstil 10 tips för spel på casinon utan svensk licens Att spela på casino utan svensk licens har blivit alltmer populärt bland svenskar. Det finns dock några saker att ha i åtanke när man väljer att... Livsstil Upptäck din inre styrka - börja med att satsa på dig själv Vi lever i en värld där det är så lätt att fokusera på de omkring oss och bli fångade i jämförelsefällan. Men det är viktigt att komma ihåg... Livsstil Så kan du bli en bättre pokerspelare Att bli en framgångsrik pokerspelare kräver inte bara tur, utan även skicklighet, strategi och uthållighet. Oavsett om du är en nybörjare som vill... Sida 1 av 1 32312345...102030...nästa >Sista
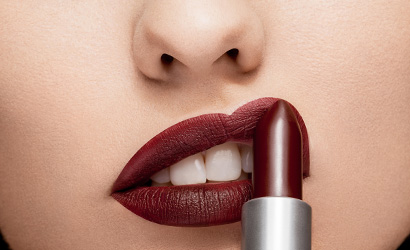
Makeup 11 onödiga sminkmissar Det finns mycket smink i skönhetsvärlden och desto fler sätt att sminka sig på. Tro det eller ej, men dina sminkrutiner kan vara fel. Vi har tagit...
10 relationstips på semestern En klassiker bara ni två – skapa nya minnen genom att dra iväg på en roadtrip
Hår Lyckas med salongsfönat hår hemma Aldrig känner vi oss så piffiga och fräscha som när vi precis vinkat hej då till frisören. Improveme.se guidar dig till hur du på bästa sätt får... Hälsa Nio effektiva sätt att lindra menssmärtorna Att ha mensvärk kan vara ett rent helvete för många. En del mår så pass dåligt att de till och med måste stanna hemma från jobbet eller skolan... Mat & dryck Så gör du dina egna macarones med lyxfaktor Aldrig förr har macarones varit så omtyckta och även om denna munsbit varit ett vanligt förekommande festinslag nere på kontinenten så dröjde det... Hudvård Lätta stegen till fina fötter Gör din fotbehandling hemma. Här kommer knepen till fina fötter hela sommaren. 1. Fotbad Tänk på att tvätta fötterna ofta under sommaren. Tappa... Hår Överlev utväxtfasen Trött på att vänta på att luggen ska växa ut? Här är din överlevnadsguide. Vissa människor trivs bäst med lugg, medan andra gillar att experimentera,... Livsstil 10 tips inför lägenhetsköpet Att köpa en lägenhet är en stor investering, både ekonomiskt och känslomässigt. Det är därför viktigt att vara väl förberedd innan du börjar... Våra mest älskade skönhetsklassiker De tidlösa produkterna vi aldrig tröttnar på Livsstil Utforska världen av casinon Välkommen till en mångsidig spelvärld bortom de svenska gränserna. Utforska casinon utan svensk licens, där ett kalejdoskop av spelmöjligheter och... Livsstil 5 kreativa sätt att använda digital teknik Teknik har blivit en integrerad del av vardagen, och för företag bidrar den till att göra olika processer mer effektiva. Med rätt verktyg hjälper... Livsstil Smarta tips vid val av ny mobil Smidig att bära med, bra kamera och snabb laddning. Det är bara några av kraven du säkert har när det är dags att köpa ny mobiltelefon. Men det... Livsstil 10 tips för spel på casinon utan svensk licens Att spela på casino utan svensk licens har blivit alltmer populärt bland svenskar. Det finns dock några saker att ha i åtanke när man väljer att... Livsstil Upptäck din inre styrka - börja med att satsa på dig själv Vi lever i en värld där det är så lätt att fokusera på de omkring oss och bli fångade i jämförelsefällan. Men det är viktigt att komma ihåg... Livsstil Så kan du bli en bättre pokerspelare Att bli en framgångsrik pokerspelare kräver inte bara tur, utan även skicklighet, strategi och uthållighet. Oavsett om du är en nybörjare som vill... Sida 1 av 1 32312345...102030...nästa >Sista
Hälsa Nio effektiva sätt att lindra menssmärtorna Att ha mensvärk kan vara ett rent helvete för många. En del mår så pass dåligt att de till och med måste stanna hemma från jobbet eller skolan... Mat & dryck Så gör du dina egna macarones med lyxfaktor Aldrig förr har macarones varit så omtyckta och även om denna munsbit varit ett vanligt förekommande festinslag nere på kontinenten så dröjde det... Hudvård Lätta stegen till fina fötter Gör din fotbehandling hemma. Här kommer knepen till fina fötter hela sommaren. 1. Fotbad Tänk på att tvätta fötterna ofta under sommaren. Tappa... Hår Överlev utväxtfasen Trött på att vänta på att luggen ska växa ut? Här är din överlevnadsguide. Vissa människor trivs bäst med lugg, medan andra gillar att experimentera,... Livsstil 10 tips inför lägenhetsköpet Att köpa en lägenhet är en stor investering, både ekonomiskt och känslomässigt. Det är därför viktigt att vara väl förberedd innan du börjar... Våra mest älskade skönhetsklassiker De tidlösa produkterna vi aldrig tröttnar på Livsstil Utforska världen av casinon Välkommen till en mångsidig spelvärld bortom de svenska gränserna. Utforska casinon utan svensk licens, där ett kalejdoskop av spelmöjligheter och... Livsstil 5 kreativa sätt att använda digital teknik Teknik har blivit en integrerad del av vardagen, och för företag bidrar den till att göra olika processer mer effektiva. Med rätt verktyg hjälper... Livsstil Smarta tips vid val av ny mobil Smidig att bära med, bra kamera och snabb laddning. Det är bara några av kraven du säkert har när det är dags att köpa ny mobiltelefon. Men det... Livsstil 10 tips för spel på casinon utan svensk licens Att spela på casino utan svensk licens har blivit alltmer populärt bland svenskar. Det finns dock några saker att ha i åtanke när man väljer att... Livsstil Upptäck din inre styrka - börja med att satsa på dig själv Vi lever i en värld där det är så lätt att fokusera på de omkring oss och bli fångade i jämförelsefällan. Men det är viktigt att komma ihåg... Livsstil Så kan du bli en bättre pokerspelare Att bli en framgångsrik pokerspelare kräver inte bara tur, utan även skicklighet, strategi och uthållighet. Oavsett om du är en nybörjare som vill... Sida 1 av 1 32312345...102030...nästa >Sista
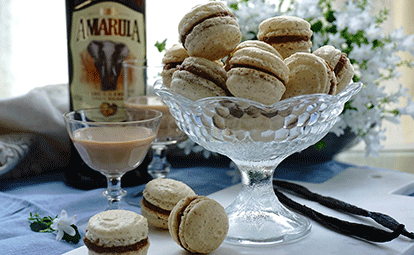
Mat & dryck Så gör du dina egna macarones med lyxfaktor Aldrig förr har macarones varit så omtyckta och även om denna munsbit varit ett vanligt förekommande festinslag nere på kontinenten så dröjde det... Hudvård Lätta stegen till fina fötter Gör din fotbehandling hemma. Här kommer knepen till fina fötter hela sommaren. 1. Fotbad Tänk på att tvätta fötterna ofta under sommaren. Tappa... Hår Överlev utväxtfasen Trött på att vänta på att luggen ska växa ut? Här är din överlevnadsguide. Vissa människor trivs bäst med lugg, medan andra gillar att experimentera,... Livsstil 10 tips inför lägenhetsköpet Att köpa en lägenhet är en stor investering, både ekonomiskt och känslomässigt. Det är därför viktigt att vara väl förberedd innan du börjar... Våra mest älskade skönhetsklassiker De tidlösa produkterna vi aldrig tröttnar på Livsstil Utforska världen av casinon Välkommen till en mångsidig spelvärld bortom de svenska gränserna. Utforska casinon utan svensk licens, där ett kalejdoskop av spelmöjligheter och... Livsstil 5 kreativa sätt att använda digital teknik Teknik har blivit en integrerad del av vardagen, och för företag bidrar den till att göra olika processer mer effektiva. Med rätt verktyg hjälper... Livsstil Smarta tips vid val av ny mobil Smidig att bära med, bra kamera och snabb laddning. Det är bara några av kraven du säkert har när det är dags att köpa ny mobiltelefon. Men det... Livsstil 10 tips för spel på casinon utan svensk licens Att spela på casino utan svensk licens har blivit alltmer populärt bland svenskar. Det finns dock några saker att ha i åtanke när man väljer att... Livsstil Upptäck din inre styrka - börja med att satsa på dig själv Vi lever i en värld där det är så lätt att fokusera på de omkring oss och bli fångade i jämförelsefällan. Men det är viktigt att komma ihåg... Livsstil Så kan du bli en bättre pokerspelare Att bli en framgångsrik pokerspelare kräver inte bara tur, utan även skicklighet, strategi och uthållighet. Oavsett om du är en nybörjare som vill... Sida 1 av 1 32312345...102030...nästa >Sista
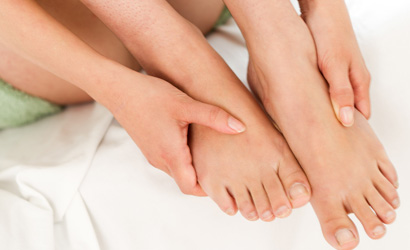
Hudvård Lätta stegen till fina fötter Gör din fotbehandling hemma. Här kommer knepen till fina fötter hela sommaren. 1. Fotbad Tänk på att tvätta fötterna ofta under sommaren. Tappa... Hår Överlev utväxtfasen Trött på att vänta på att luggen ska växa ut? Här är din överlevnadsguide. Vissa människor trivs bäst med lugg, medan andra gillar att experimentera,... Livsstil 10 tips inför lägenhetsköpet Att köpa en lägenhet är en stor investering, både ekonomiskt och känslomässigt. Det är därför viktigt att vara väl förberedd innan du börjar... Våra mest älskade skönhetsklassiker De tidlösa produkterna vi aldrig tröttnar på Livsstil Utforska världen av casinon Välkommen till en mångsidig spelvärld bortom de svenska gränserna. Utforska casinon utan svensk licens, där ett kalejdoskop av spelmöjligheter och... Livsstil 5 kreativa sätt att använda digital teknik Teknik har blivit en integrerad del av vardagen, och för företag bidrar den till att göra olika processer mer effektiva. Med rätt verktyg hjälper... Livsstil Smarta tips vid val av ny mobil Smidig att bära med, bra kamera och snabb laddning. Det är bara några av kraven du säkert har när det är dags att köpa ny mobiltelefon. Men det... Livsstil 10 tips för spel på casinon utan svensk licens Att spela på casino utan svensk licens har blivit alltmer populärt bland svenskar. Det finns dock några saker att ha i åtanke när man väljer att... Livsstil Upptäck din inre styrka - börja med att satsa på dig själv Vi lever i en värld där det är så lätt att fokusera på de omkring oss och bli fångade i jämförelsefällan. Men det är viktigt att komma ihåg... Livsstil Så kan du bli en bättre pokerspelare Att bli en framgångsrik pokerspelare kräver inte bara tur, utan även skicklighet, strategi och uthållighet. Oavsett om du är en nybörjare som vill... Sida 1 av 1 32312345...102030...nästa >Sista
Hår Överlev utväxtfasen Trött på att vänta på att luggen ska växa ut? Här är din överlevnadsguide. Vissa människor trivs bäst med lugg, medan andra gillar att experimentera,... Livsstil 10 tips inför lägenhetsköpet Att köpa en lägenhet är en stor investering, både ekonomiskt och känslomässigt. Det är därför viktigt att vara väl förberedd innan du börjar... Våra mest älskade skönhetsklassiker De tidlösa produkterna vi aldrig tröttnar på Livsstil Utforska världen av casinon Välkommen till en mångsidig spelvärld bortom de svenska gränserna. Utforska casinon utan svensk licens, där ett kalejdoskop av spelmöjligheter och... Livsstil 5 kreativa sätt att använda digital teknik Teknik har blivit en integrerad del av vardagen, och för företag bidrar den till att göra olika processer mer effektiva. Med rätt verktyg hjälper... Livsstil Smarta tips vid val av ny mobil Smidig att bära med, bra kamera och snabb laddning. Det är bara några av kraven du säkert har när det är dags att köpa ny mobiltelefon. Men det... Livsstil 10 tips för spel på casinon utan svensk licens Att spela på casino utan svensk licens har blivit alltmer populärt bland svenskar. Det finns dock några saker att ha i åtanke när man väljer att... Livsstil Upptäck din inre styrka - börja med att satsa på dig själv Vi lever i en värld där det är så lätt att fokusera på de omkring oss och bli fångade i jämförelsefällan. Men det är viktigt att komma ihåg... Livsstil Så kan du bli en bättre pokerspelare Att bli en framgångsrik pokerspelare kräver inte bara tur, utan även skicklighet, strategi och uthållighet. Oavsett om du är en nybörjare som vill... Sida 1 av 1 32312345...102030...nästa >Sista
Livsstil 10 tips inför lägenhetsköpet Att köpa en lägenhet är en stor investering, både ekonomiskt och känslomässigt. Det är därför viktigt att vara väl förberedd innan du börjar... Våra mest älskade skönhetsklassiker De tidlösa produkterna vi aldrig tröttnar på Livsstil Utforska världen av casinon Välkommen till en mångsidig spelvärld bortom de svenska gränserna. Utforska casinon utan svensk licens, där ett kalejdoskop av spelmöjligheter och... Livsstil 5 kreativa sätt att använda digital teknik Teknik har blivit en integrerad del av vardagen, och för företag bidrar den till att göra olika processer mer effektiva. Med rätt verktyg hjälper... Livsstil Smarta tips vid val av ny mobil Smidig att bära med, bra kamera och snabb laddning. Det är bara några av kraven du säkert har när det är dags att köpa ny mobiltelefon. Men det... Livsstil 10 tips för spel på casinon utan svensk licens Att spela på casino utan svensk licens har blivit alltmer populärt bland svenskar. Det finns dock några saker att ha i åtanke när man väljer att... Livsstil Upptäck din inre styrka - börja med att satsa på dig själv Vi lever i en värld där det är så lätt att fokusera på de omkring oss och bli fångade i jämförelsefällan. Men det är viktigt att komma ihåg... Livsstil Så kan du bli en bättre pokerspelare Att bli en framgångsrik pokerspelare kräver inte bara tur, utan även skicklighet, strategi och uthållighet. Oavsett om du är en nybörjare som vill... Sida 1 av 1 32312345...102030...nästa >Sista
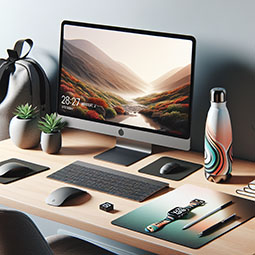
Livsstil Utforska världen av casinon Välkommen till en mångsidig spelvärld bortom de svenska gränserna. Utforska casinon utan svensk licens, där ett kalejdoskop av spelmöjligheter och... Livsstil 5 kreativa sätt att använda digital teknik Teknik har blivit en integrerad del av vardagen, och för företag bidrar den till att göra olika processer mer effektiva. Med rätt verktyg hjälper... Livsstil Smarta tips vid val av ny mobil Smidig att bära med, bra kamera och snabb laddning. Det är bara några av kraven du säkert har när det är dags att köpa ny mobiltelefon. Men det... Livsstil 10 tips för spel på casinon utan svensk licens Att spela på casino utan svensk licens har blivit alltmer populärt bland svenskar. Det finns dock några saker att ha i åtanke när man väljer att... Livsstil Upptäck din inre styrka - börja med att satsa på dig själv Vi lever i en värld där det är så lätt att fokusera på de omkring oss och bli fångade i jämförelsefällan. Men det är viktigt att komma ihåg... Livsstil Så kan du bli en bättre pokerspelare Att bli en framgångsrik pokerspelare kräver inte bara tur, utan även skicklighet, strategi och uthållighet. Oavsett om du är en nybörjare som vill... Sida 1 av 1 32312345...102030...nästa >Sista
Livsstil 5 kreativa sätt att använda digital teknik Teknik har blivit en integrerad del av vardagen, och för företag bidrar den till att göra olika processer mer effektiva. Med rätt verktyg hjälper... Livsstil Smarta tips vid val av ny mobil Smidig att bära med, bra kamera och snabb laddning. Det är bara några av kraven du säkert har när det är dags att köpa ny mobiltelefon. Men det... Livsstil 10 tips för spel på casinon utan svensk licens Att spela på casino utan svensk licens har blivit alltmer populärt bland svenskar. Det finns dock några saker att ha i åtanke när man väljer att... Livsstil Upptäck din inre styrka - börja med att satsa på dig själv Vi lever i en värld där det är så lätt att fokusera på de omkring oss och bli fångade i jämförelsefällan. Men det är viktigt att komma ihåg... Livsstil Så kan du bli en bättre pokerspelare Att bli en framgångsrik pokerspelare kräver inte bara tur, utan även skicklighet, strategi och uthållighet. Oavsett om du är en nybörjare som vill... Sida 1 av 1 32312345...102030...nästa >Sista
Livsstil Smarta tips vid val av ny mobil Smidig att bära med, bra kamera och snabb laddning. Det är bara några av kraven du säkert har när det är dags att köpa ny mobiltelefon. Men det... Livsstil 10 tips för spel på casinon utan svensk licens Att spela på casino utan svensk licens har blivit alltmer populärt bland svenskar. Det finns dock några saker att ha i åtanke när man väljer att... Livsstil Upptäck din inre styrka - börja med att satsa på dig själv Vi lever i en värld där det är så lätt att fokusera på de omkring oss och bli fångade i jämförelsefällan. Men det är viktigt att komma ihåg... Livsstil Så kan du bli en bättre pokerspelare Att bli en framgångsrik pokerspelare kräver inte bara tur, utan även skicklighet, strategi och uthållighet. Oavsett om du är en nybörjare som vill... Sida 1 av 1 32312345...102030...nästa >Sista
Livsstil 10 tips för spel på casinon utan svensk licens Att spela på casino utan svensk licens har blivit alltmer populärt bland svenskar. Det finns dock några saker att ha i åtanke när man väljer att... Livsstil Upptäck din inre styrka - börja med att satsa på dig själv Vi lever i en värld där det är så lätt att fokusera på de omkring oss och bli fångade i jämförelsefällan. Men det är viktigt att komma ihåg... Livsstil Så kan du bli en bättre pokerspelare Att bli en framgångsrik pokerspelare kräver inte bara tur, utan även skicklighet, strategi och uthållighet. Oavsett om du är en nybörjare som vill... Sida 1 av 1 32312345...102030...nästa >Sista
Livsstil Upptäck din inre styrka - börja med att satsa på dig själv Vi lever i en värld där det är så lätt att fokusera på de omkring oss och bli fångade i jämförelsefällan. Men det är viktigt att komma ihåg... Livsstil Så kan du bli en bättre pokerspelare Att bli en framgångsrik pokerspelare kräver inte bara tur, utan även skicklighet, strategi och uthållighet. Oavsett om du är en nybörjare som vill... Sida 1 av 1 32312345...102030...nästa >Sista
Livsstil Så kan du bli en bättre pokerspelare Att bli en framgångsrik pokerspelare kräver inte bara tur, utan även skicklighet, strategi och uthållighet. Oavsett om du är en nybörjare som vill... Sida 1 av 1 32312345...102030...nästa >Sista